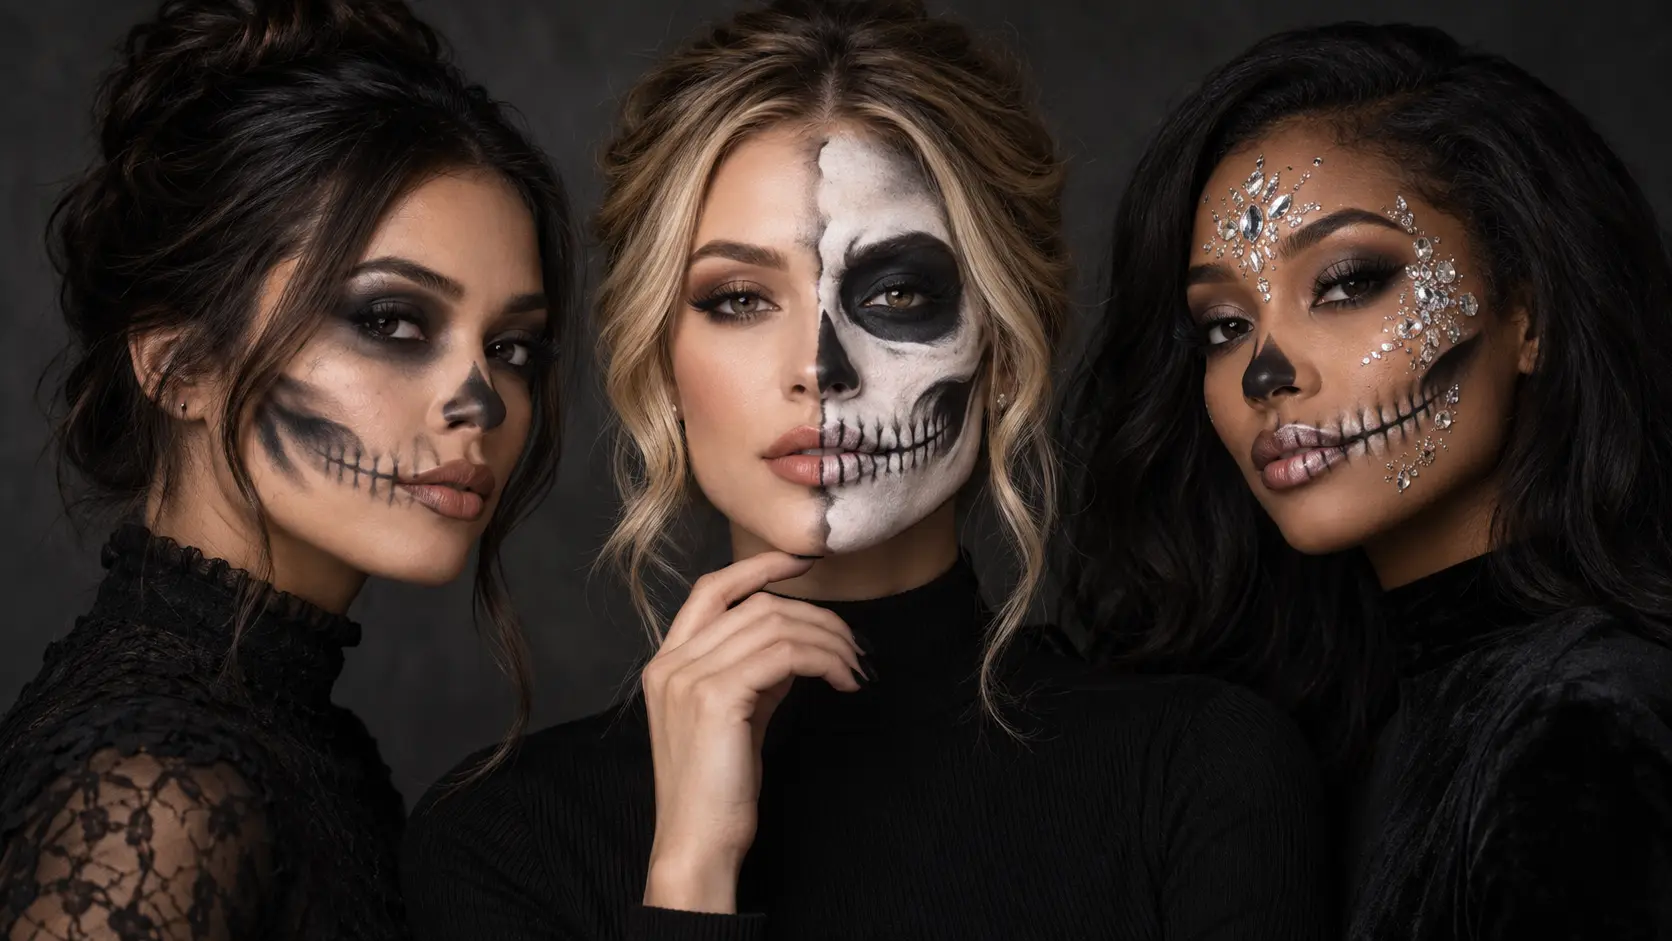
Skeleton makeup does not have to mean covering your entire face in thick black-and-white paint. This season’s most wearable skeleton looks combine recognizable skull details with flattering eye makeup, natural skin, crystals, color, and fashion-forward styling.
Whether you want a quick Halloween look or something dramatic enough for a costume party, these 11 skeleton makeup ideas offer plenty of room to personalize the result. You can recreate the full designs or borrow one feature—such as a skeletal mouth, hollow eyes, or painted nose—to create a simpler version that still makes an impact.
1. Create a Matching Half-Skull Couple Look
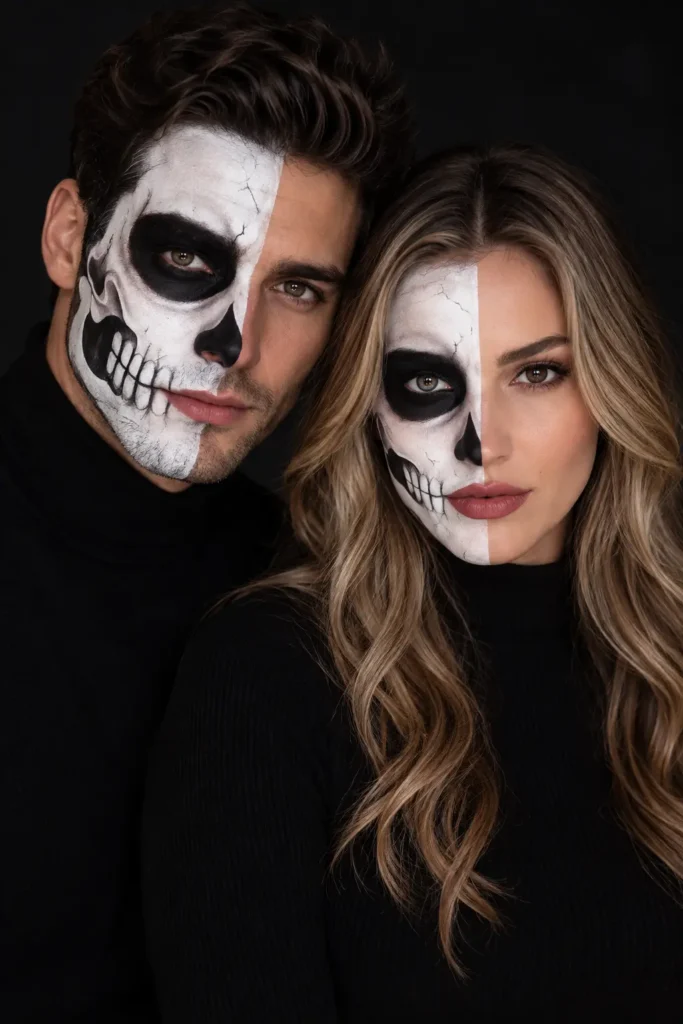
Imagine arriving at a Halloween party with matching makeup that looks coordinated without feeling like a predictable costume. A half-skull couple look creates that effect by transforming one side of each person’s face while leaving the other side natural.
This design works especially well for couples, best friends, siblings, or anyone planning a paired Halloween costume. The sharp division between the natural and painted sides makes the result photograph beautifully, even when the makeup itself is fairly simple.
Start by drawing a straight guideline down the center of each face. Cover one side with white face paint, then add a black eye socket, hollow nose shape, cheek contour, and individual skeletal teeth. Keep the unpainted half fresh and polished with light foundation, defined brows, and subtle lip color.
You do not need to make both faces identical. Reversing the painted sides can create a more balanced look when you stand together.
Styling tip: Dress both people in matching black high-neck tops so the contrasting face paint remains the main focus.
2. Create a Smoky Full-Face Skeleton
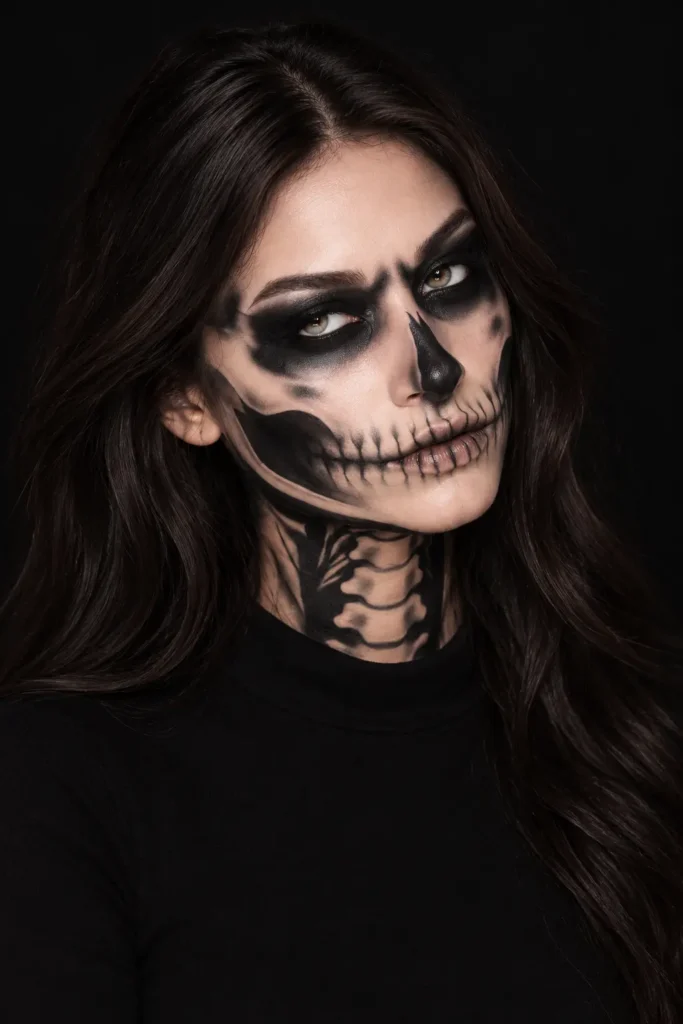
Picture a traditional skull look softened by smoky blending, realistic shadows, and a touch of beauty makeup. This version feels dark and dramatic, but it remains more flattering than a sharply painted black-and-white skeleton.
It is ideal for anyone who loves intense Halloween makeup and wants a design that works with a simple black outfit. The blended finish also makes small mistakes less noticeable, which is helpful if you are still developing your face-painting skills.
Begin with your usual complexion base. Blend black or charcoal pigment around the eyes, extending it toward the temples. Paint the tip and sides of the nose black, then shade beneath the cheekbones to create hollow-looking cheeks. Draw fine vertical lines across the lips before softly blending the edges.
Continue some of the shading down the neck to suggest vertebrae and collarbones. This creates a more complete effect without requiring a full costume.
Application tip: Use a small fluffy eyeshadow brush to diffuse harsh edges and create natural-looking depth around the eyes and cheeks.
3. Create a Glam Crystal Half-Skull
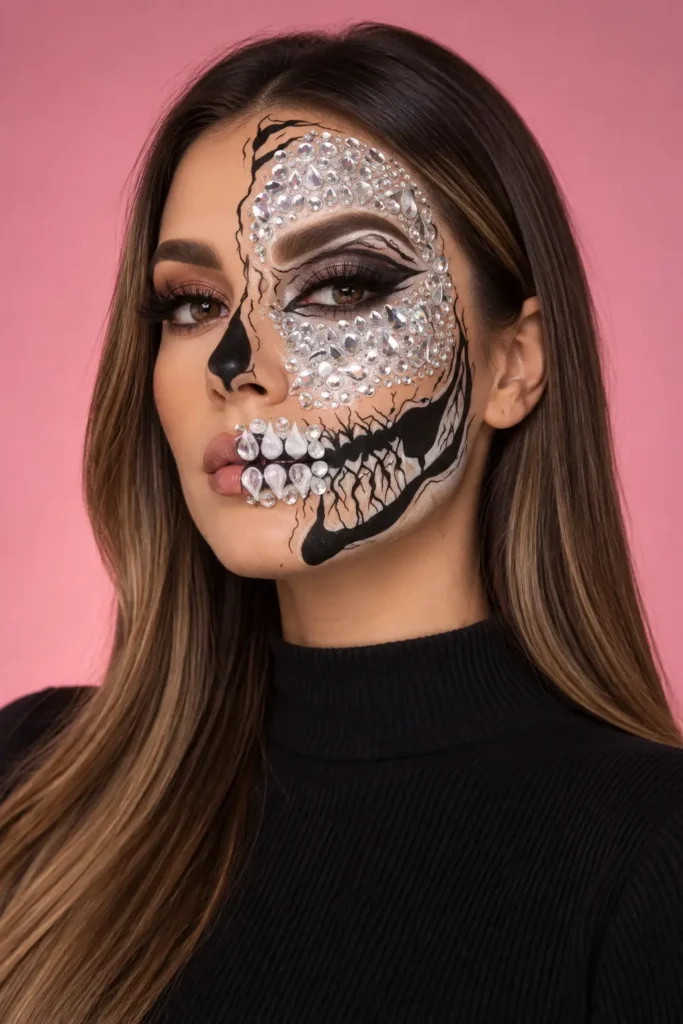
If you want your Halloween makeup to sparkle instead of simply looking spooky, picture one side of your face covered in crystals while the other side keeps its usual glamorous finish.
This look suits beauty lovers who enjoy rhinestones, dramatic lashes, and editorial makeup. It is also a strong choice for parties and photos because the crystals catch light beautifully from different angles.
Apply your regular foundation and eye makeup first. Sketch the skull details on one side of your face, concentrating around the eye, cheekbone, jaw, and mouth. Add silver or clear face gems in different sizes, placing the larger stones near the center and smaller ones around the edges. Complete the skull effect with a black nose detail and a partially painted skeletal jaw.
Keeping one side of the face natural prevents the finished makeup from feeling too heavy. It also lets you combine Halloween artistry with your favorite glam techniques.
Customization tip: Replace clear crystals with pearls, iridescent gems, or stones that match your outfit.
4. Create a Glitter-Edged Black Skull
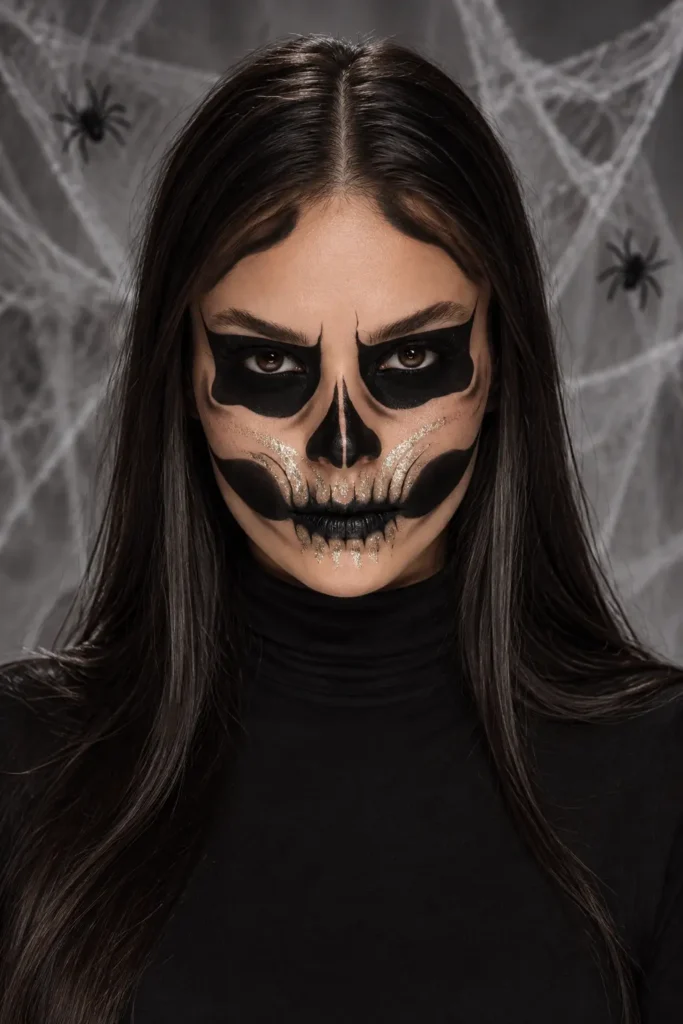
Imagine a bold black skull design with just enough shimmer to catch the light. This look uses graphic eye sockets and a defined skeletal mouth, while fine glitter gives the traditionally dark makeup a more polished finish.
It works well for anyone who wants a recognizable skeleton costume without painting the entire face white. Because much of the natural complexion remains visible, the look feels lighter and is generally more comfortable to wear for several hours.
Outline large black shapes around the eyes, keeping them as symmetrical as possible. Fill in the nose and create curved black shadows along the cheeks. Draw skeletal teeth across the lips, then place cosmetic glitter or metallic pigment along selected edges.
The contrast between matte black paint and reflective details gives the makeup extra dimension. You can keep the glitter subtle or build it up depending on how glamorous you want the result to appear.
Styling tip: Pair the makeup with sleek, center-parted hair and a black leather jacket for a sharp, modern finish.
5. Create a Faded Skeleton with Teal Hair
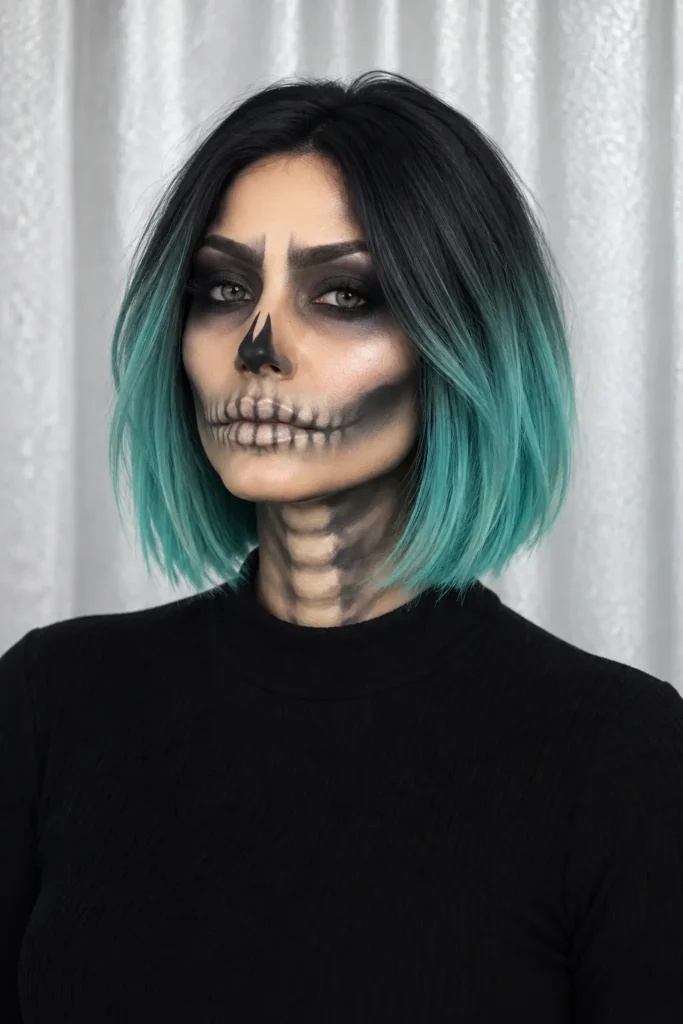
Picture cool teal hair framing a softly shaded skull face. Instead of solid blocks of paint, this look uses faded charcoal tones to create a slightly worn, mysterious finish.
It is especially flattering for people with colorful hair, ombré wigs, or a preference for alternative beauty. It also works well if you want skeleton makeup that appears dramatic from a distance but still shows your natural features up close.
Blend smoky grey pigment around the eyes and underneath the cheekbones. Add a narrow black nose shape and lightly sketch teeth across the lips. Extend muted grey shading down the neck to suggest bones, but keep the lines soft rather than overly precise.
The teal hair provides a striking contrast against black and grey makeup. If you do not want to color your natural hair, a short ombré wig can create the same effect instantly.
Customization tip: Try purple, blue, emerald, or silver hair depending on the color palette of your Halloween outfit.
6. Create a Red Rhinestone Skeleton
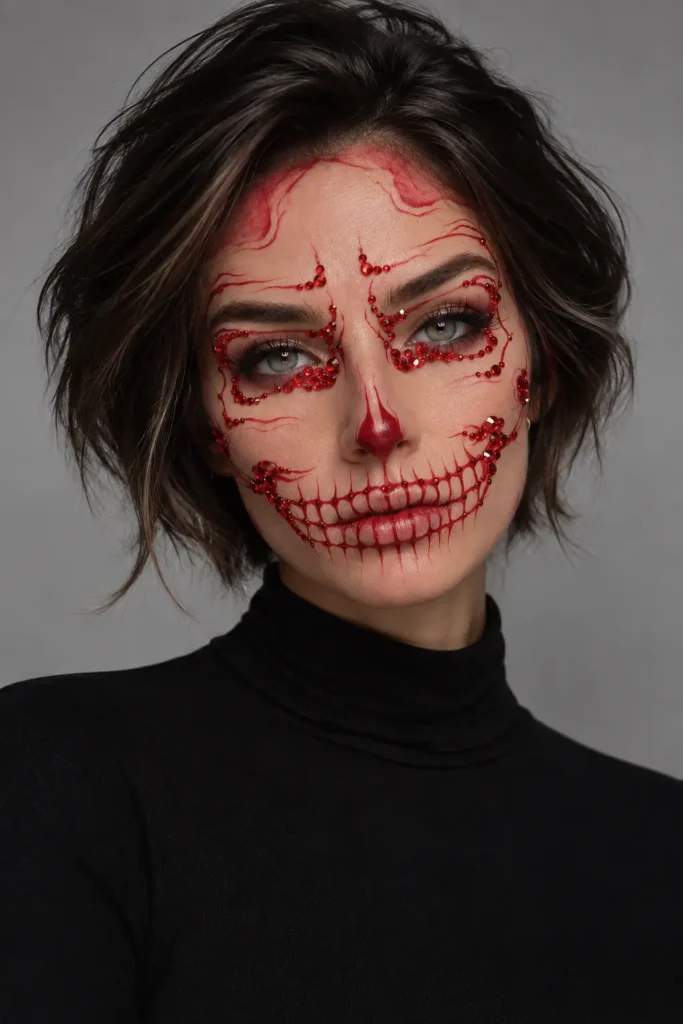
Imagine fine red lines tracing your features like glowing cracks, with tiny rhinestones sparkling around your eyes. This skeleton look feels elegant, artistic, and noticeably different from the usual monochrome skull.
It suits anyone who loves detailed makeup but wants to avoid covering the face with a heavy base. The delicate design leaves much of the skin visible, making it feel lighter and more wearable for parties, dinners, or indoor events.
Use a fine liner brush to draw red lines around the eyes, across the forehead, and toward the temples. Paint a small red nose detail and create a skeletal mouth with thin vertical strokes. Once the paint has dried, place red gems along selected lines using skin-safe cosmetic adhesive.
Keep the remaining makeup relatively simple so the red details do not compete with strong eyeshadow or lip color.
Application tip: Plan the rhinestone placement before applying adhesive, starting with the larger stones and filling the gaps with smaller gems.
7. Create a Softly Sculpted Traditional Skull
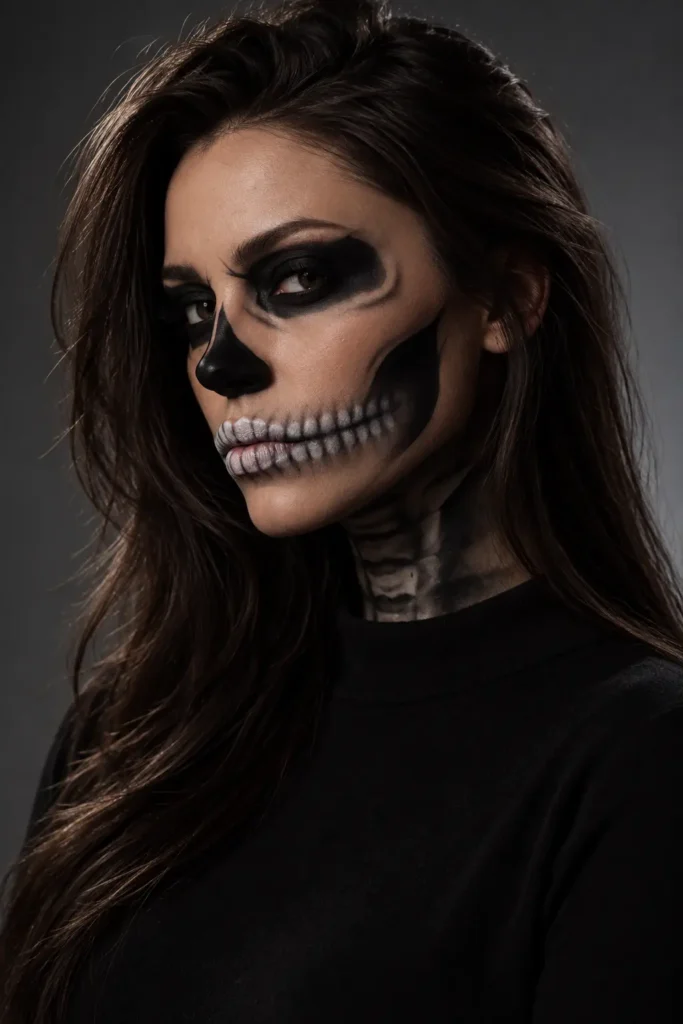
Picture a classic skeleton face, but with the black areas softly blended into your skin rather than outlined like a mask. This sculpted approach creates convincing depth while remaining elegant and editorial.
The design is a great fit for people who appreciate traditional Halloween makeup but prefer a more refined result. It also looks impressive with minimal clothing or accessories because the shading provides plenty of visual detail.
Build the eye sockets with black eyeshadow, blending the edges outward. Darken the nose and hollows of the cheeks, then paint pale teeth across the mouth. Add shadow beneath the jaw and continue it down the neck to make the face appear more skeletal.
Working gradually is important. Start with grey pigment and deepen selected areas with black once you are satisfied with the placement.
Styling tip: Add gentle side lighting when taking photographs—it enhances the painted contours and makes the skeletal structure look more dimensional.
8. Create a Neon Pop-Art Skeleton
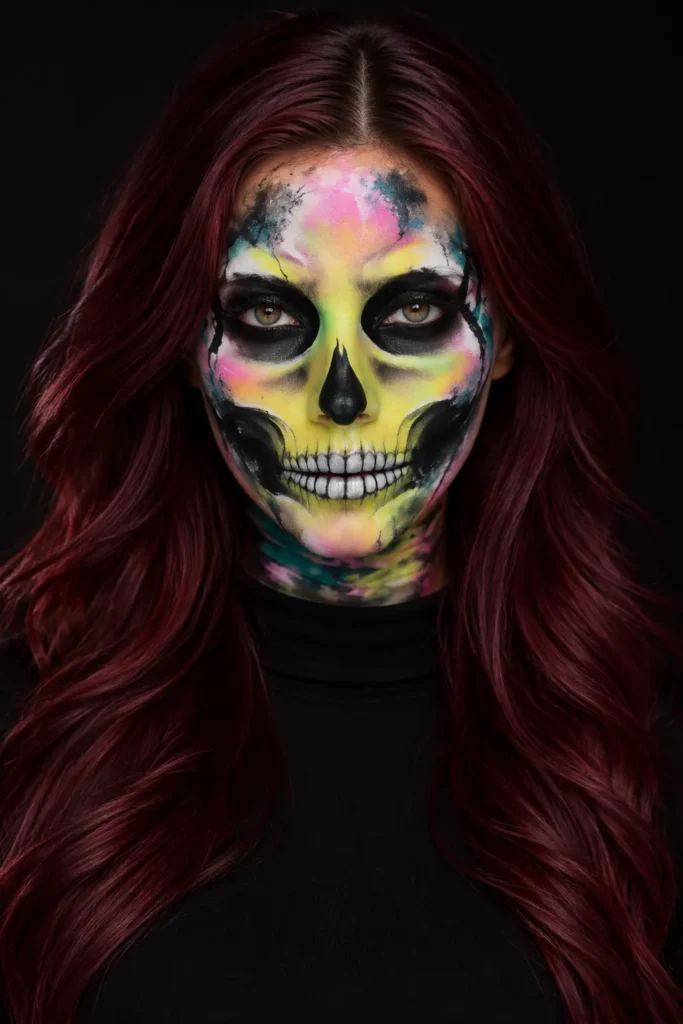
Imagine a skull brought to life with vivid yellow, pink, turquoise, and black paint. The familiar skeletal structure is still visible, but the bright color makes the result playful, energetic, and unexpectedly modern.
This design is perfect for creative makeup lovers, themed parties, festivals, and anyone who wants to stand out from a crowd of traditional skeletons. It can also be customized to match almost any costume.
Begin by placing a bright base color through the center of the face. Add black eye sockets, a dark nose, shaded cheek hollows, and white skeletal teeth. Blend pink, blue, or green around the outer edges, allowing the colors to overlap slightly for a painted, pop-art effect.
Precision is not essential. Uneven blending, cracks, and brush-like textures can make the design appear more artistic.
Customization tip: Choose two or three neon shades from your outfit and repeat them on your face and neck for a coordinated result.
9. Create a Quick Minimal Skeleton
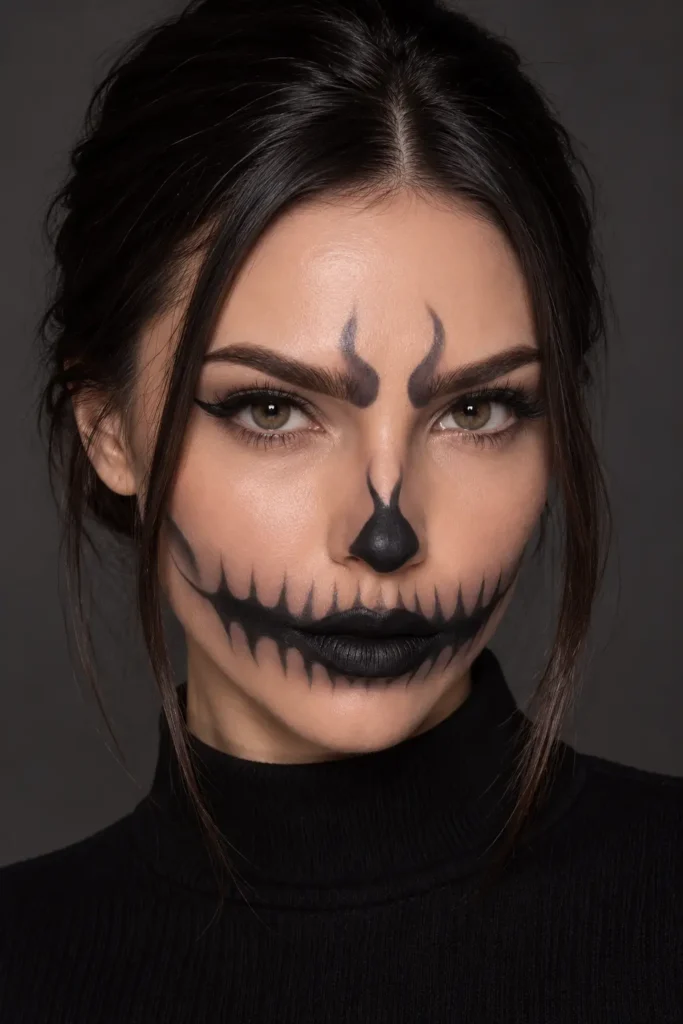
Picture your usual glam makeup with only a black nose, dark lips, and a few carefully placed skeletal lines. The result is clearly Halloween-inspired, but it does not require hours of preparation.
This is one of the best options for beginners, last-minute events, work parties, or anyone who dislikes wearing heavy face paint. It is also easy to remove at the end of the night.
Apply your regular base and eye makeup first. Paint the tip of the nose black, fill the lips with black lipstick, and extend the corners of the mouth slightly. Draw thin vertical strokes above and below the lips to suggest skeletal teeth. Small dark accents between the brows can add extra character without overwhelming the design.
Because the look is intentionally simple, clean lines make a significant difference.
Application tip: Use waterproof gel eyeliner and a fine angled brush for greater control around the nose and mouth.
10. Create a Hooded Skeleton-Mask Effect
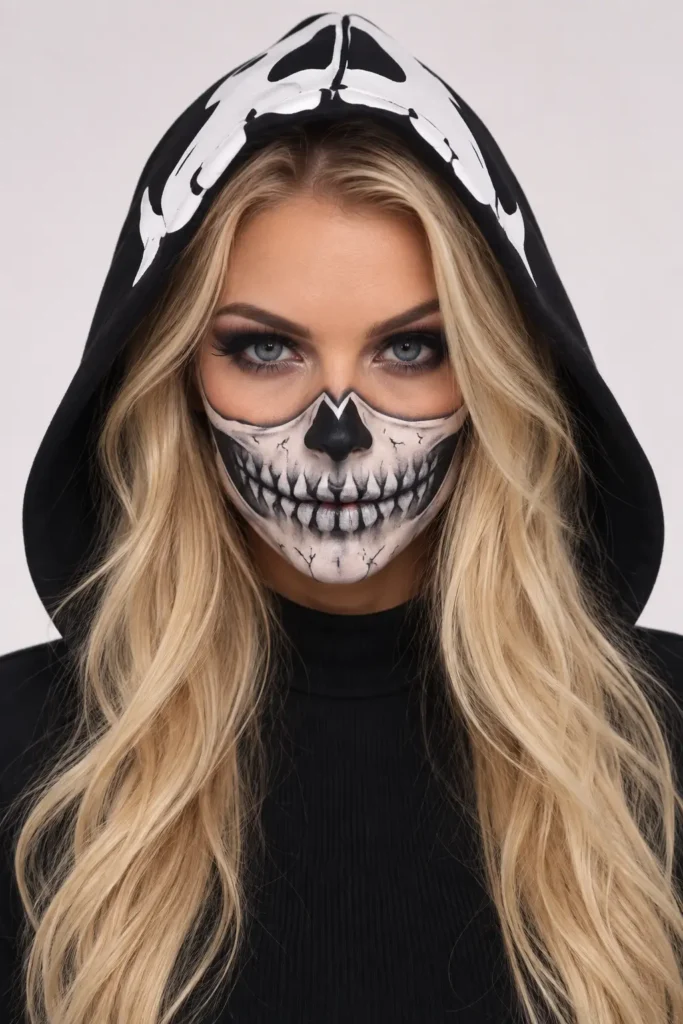
Imagine pulling up your hood to reveal a painted skull mask across the lower half of your face. Your eyes remain glamorous and expressive while the mouth and jaw create the spooky transformation.
This look is suitable for anyone who wants an easy costume that still feels complete. It is particularly useful for outdoor celebrations because the hood becomes part of both the outfit and the overall composition.
Keep the upper face natural or add smoky eye makeup and false lashes. Paint the lower half of the face white, shaping the upper edge beneath the eyes. Add a black nose, hollow cheek details, cracks, and individual teeth across the lips and jaw.
A black hooded top or skeleton-print outfit instantly connects the makeup to the costume, eliminating the need for elaborate accessories.
Styling tip: Keep blonde or light-colored hair visible around the hood to create strong contrast against the black costume.
11. Create a Graphic Red-and-White Skull
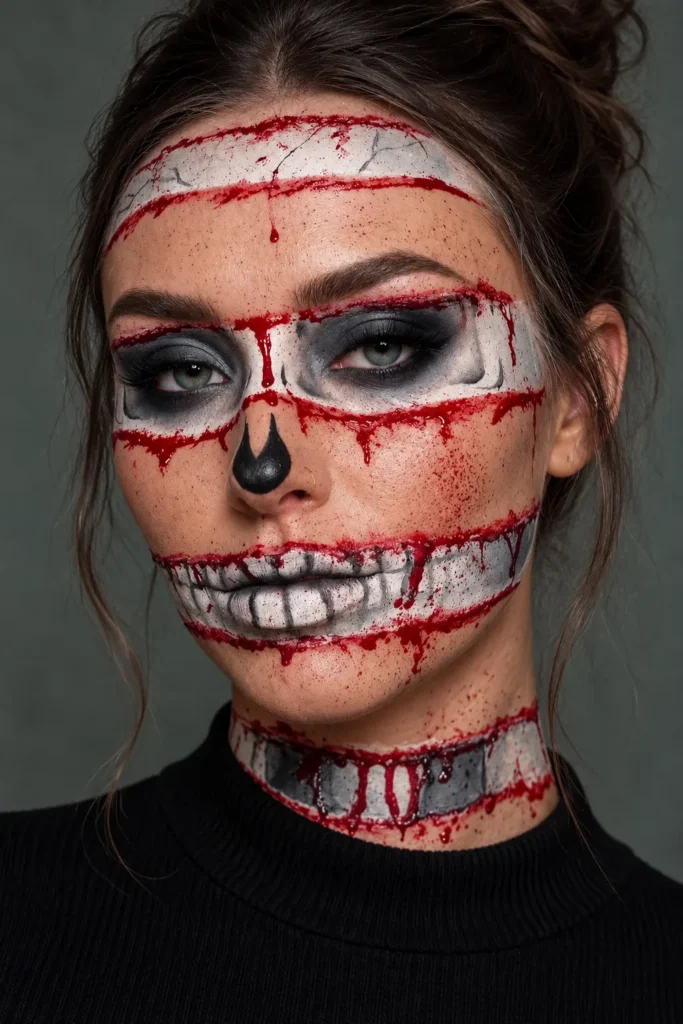
Picture your face divided into painted bone panels, with red cracked lines and theatrical drips outlining each section. This graphic skeleton design has a slightly unsettling finish while still looking controlled and artistic.
It is ideal for experienced makeup lovers or anyone searching for a bolder Halloween transformation. Although it appears complex, the design is built from simple shapes that can be applied one section at a time.
Begin by outlining the forehead, eye sockets, cheek panels, mouth, and neck sections. Fill selected areas with white face paint and shade around the eyes using charcoal grey. Add white rectangular teeth across the lips. Finally, trace the borders with red theatrical paint and create a few carefully positioned drips.
Keep the red detailing stylized rather than realistic. This maintains the beauty-editorial quality of the finished look.
Application tip: Tilt your head naturally while the red liquid-effect makeup sets so you can control the direction and length of each drip.
How to Make Skeleton Makeup More Wearable
Even detailed skeleton makeup can feel comfortable and flattering when you approach it strategically. You do not need to reproduce every feature from a reference image. Instead, choose the elements that will have the greatest visual impact.
For a lighter result, concentrate on the eyes, nose, and lips while leaving the rest of your complexion natural. If you want something more dramatic, continue the design onto the neck or incorporate crystals, glitter, and colored paint.
Always prepare your skin with moisturizer and a primer that works with your chosen face paint. Use products labeled as suitable for cosmetic use, particularly around the eyes and mouth. Set cream makeup with translucent powder or matching eyeshadow to reduce transfer.
Before going to bed, loosen heavy makeup with an oil-based cleanser or cleansing balm. Follow with a gentle facial cleanser and moisturizer rather than scrubbing the skin.