
Contour makeup has changed. The days of drawing sharp brown lines across the face and spending hours blending are slowly being replaced by softer, more natural techniques that focus on enhancing your own features.
Many people still avoid contour because they associate it with complicated tutorials, heavy makeup, or unrealistic transformations. But modern contouring is much simpler. The latest trends focus on subtle shadows, lightweight formulas, and strategic placement that creates definition while allowing your skin to look natural.
Today’s contour techniques are designed for real life — from quick everyday makeup before work to polished looks for events. The goal is not to create a completely different face, but to bring balance, depth, and dimension to your natural features.
Why Modern Contour Makeup Looks Different Today
Traditional contouring focused heavily on creating dramatic cheekbones, a sharper jawline, and a slimmer-looking nose. While this technique still has its place for photography and glam makeup, many beauty trends have moved toward a softer approach.
Modern contour makeup focuses on:
- Using less product
- Choosing shades that resemble natural shadows
- Blending products into the skin instead of sitting on top
- Combining contour with blush and highlighting
- Creating definition that looks effortless
The biggest change is that contour is no longer about hiding or changing your face shape. It is about understanding your own features and enhancing the areas where natural shadows already exist.
How to Choose the Right Contour Shade
The right contour shade can make the entire makeup look more natural. One of the most common mistakes is choosing a product that is too dark, too warm, or too orange.
A good contour shade should imitate the color of a natural shadow rather than look like a bronze stripe.
Fair Skin
People with fair skin often suit soft taupe, neutral beige, and light brown shades. Very dark or warm shades can easily look harsh.
Medium Skin
Neutral brown and muted caramel shades usually create natural-looking definition without overpowering the complexion.
Deep Skin
Rich brown shades with balanced undertones can add structure while maintaining a natural appearance.
Remember that contour and bronzer serve different purposes:
Contour: Creates the appearance of depth and structure.
Bronzer: Adds warmth and a sun-kissed effect.
Using bronzer as contour may add color but may not create the same sculpted effect.
Fresh Contour Makeup Techniques to Try
1. Underpainting Contour: The Invisible Sculpting Technique
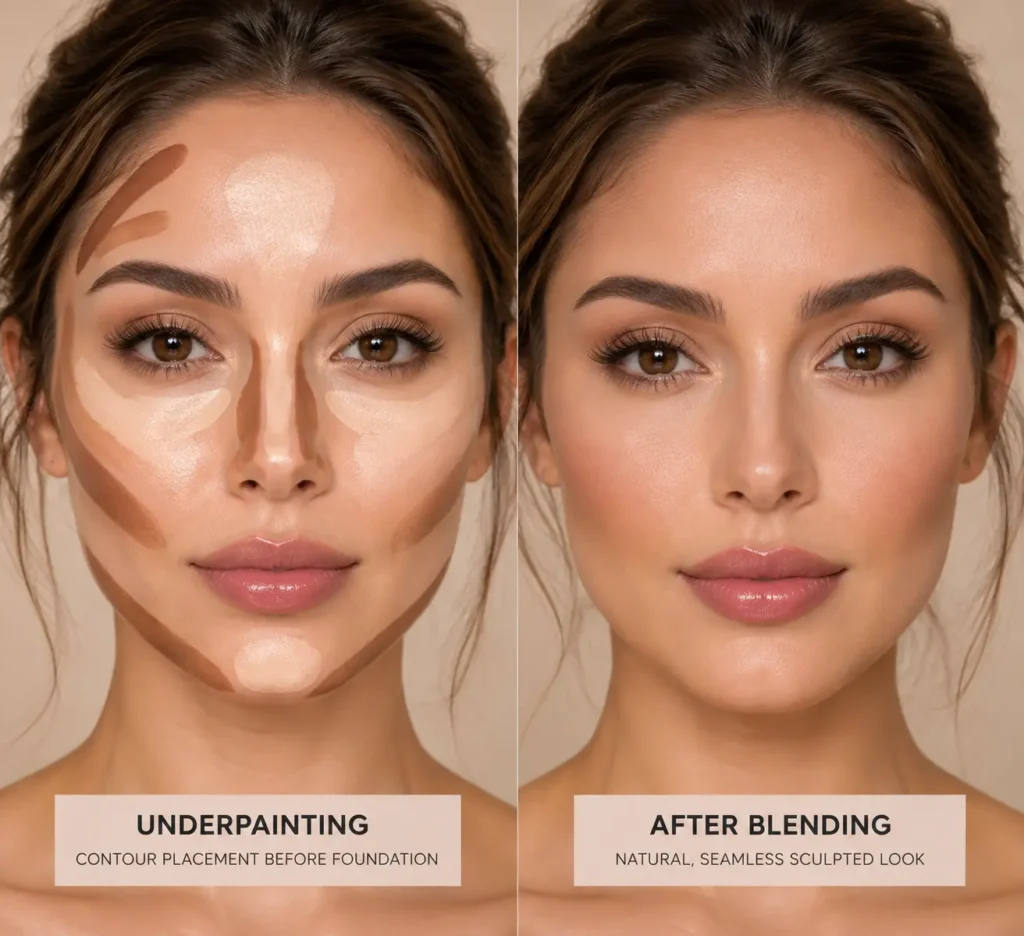
Underpainting is one of the biggest modern contour trends because it creates a softer, more blended result.
Instead of applying contour after foundation, this method places contour underneath your base makeup.
How to do it:
Apply cream contour to areas where natural shadows appear, such as under the cheekbones, temples, and jawline. Then apply a thin layer of foundation or skin tint over the top and blend everything together.
Why it works:
- Creates a natural shadow effect
- Prevents harsh contour lines
- Gives the skin a more seamless finish
This technique is especially useful for people who want definition without a heavy makeup appearance.
2. Lifted Contour Placement
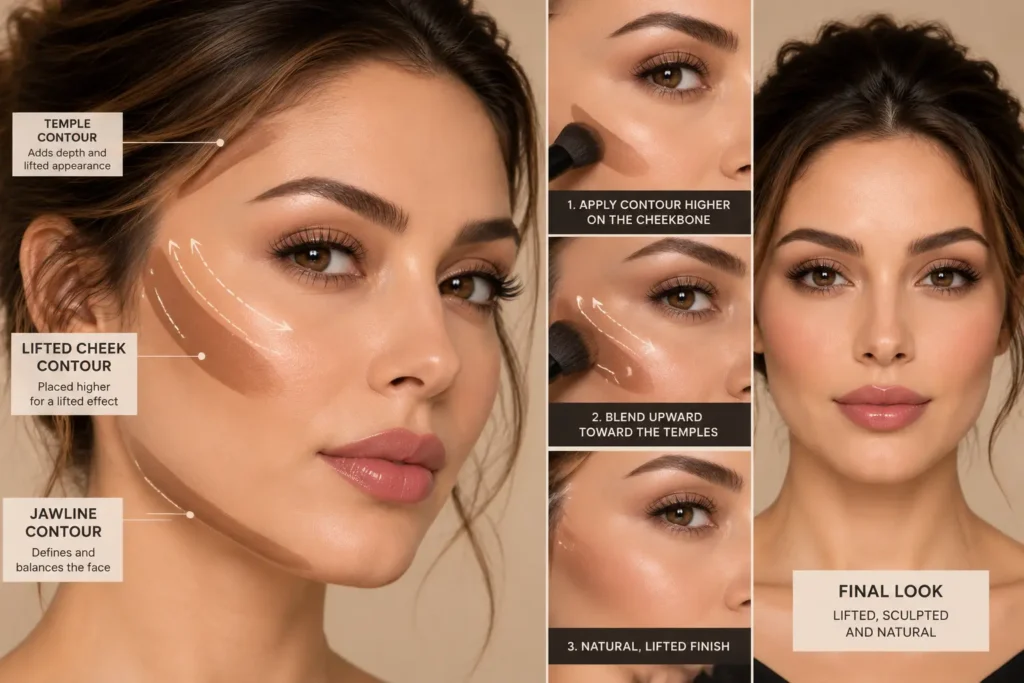
The placement of contour has changed significantly in recent years.
The traditional method placed contour directly below the cheekbone. The newer approach focuses on placing the product slightly higher and blending upward toward the temples.
This creates a lifted appearance and works well with modern makeup styles that focus on freshness and balance.
Pro Tip: Avoid blending contour downward because it can make the face appear heavier. Upward blending usually creates a softer effect.
3. Micro Contouring for Everyday Makeup
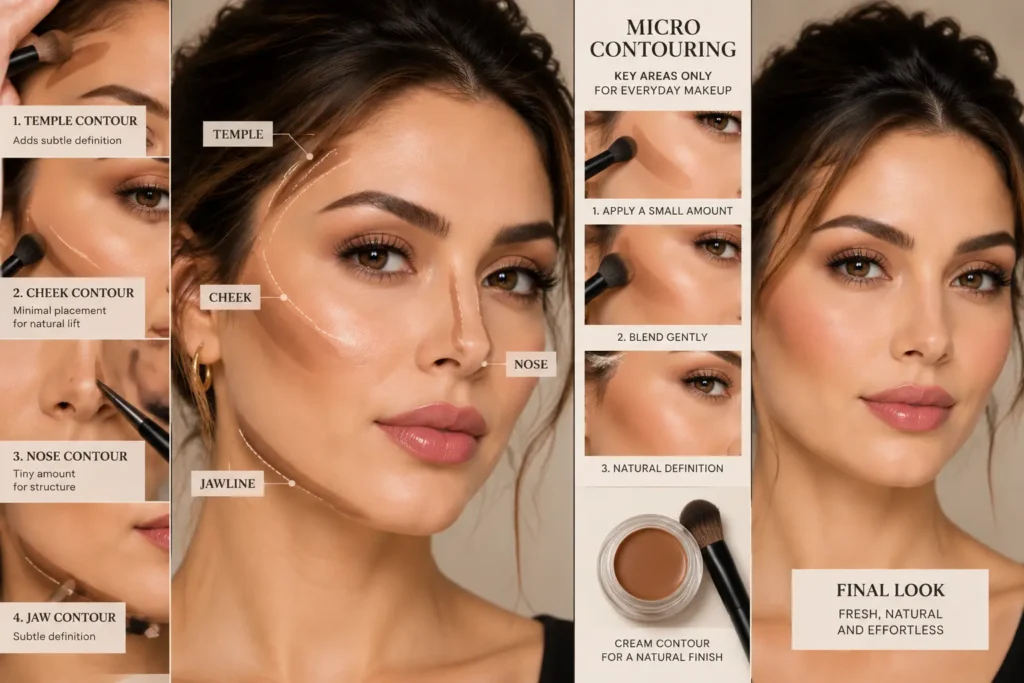
Micro contouring is perfect for people who want definition without a full sculpted look.
Instead of contouring the entire face, this technique focuses on small areas where subtle changes create the biggest impact.
Common areas include:
- Cheek hollows
- Nose sides
- Jaw corners
- Temples
This approach works especially well for:
- Office makeup
- Minimal makeup routines
- Beginners
- Natural beauty looks
4. Liquid Sculpting for a Skin-Like Finish
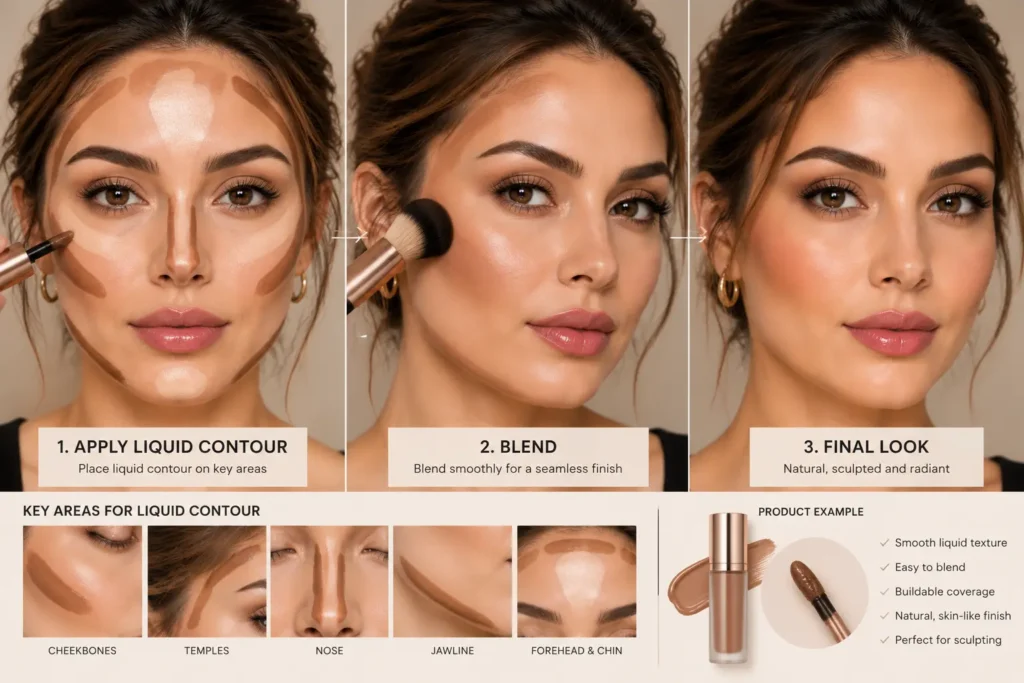
Liquid and cream contour products have become popular because they blend easily and create a more natural finish compared with heavier powders.
They are often suitable for:
- Dry skin
- Normal skin
- Mature skin
- Natural makeup styles
The key is applying thin layers. Too much product can make blending difficult and create an artificial appearance.
5. Reverse Contouring: Using Light Instead of Shadow
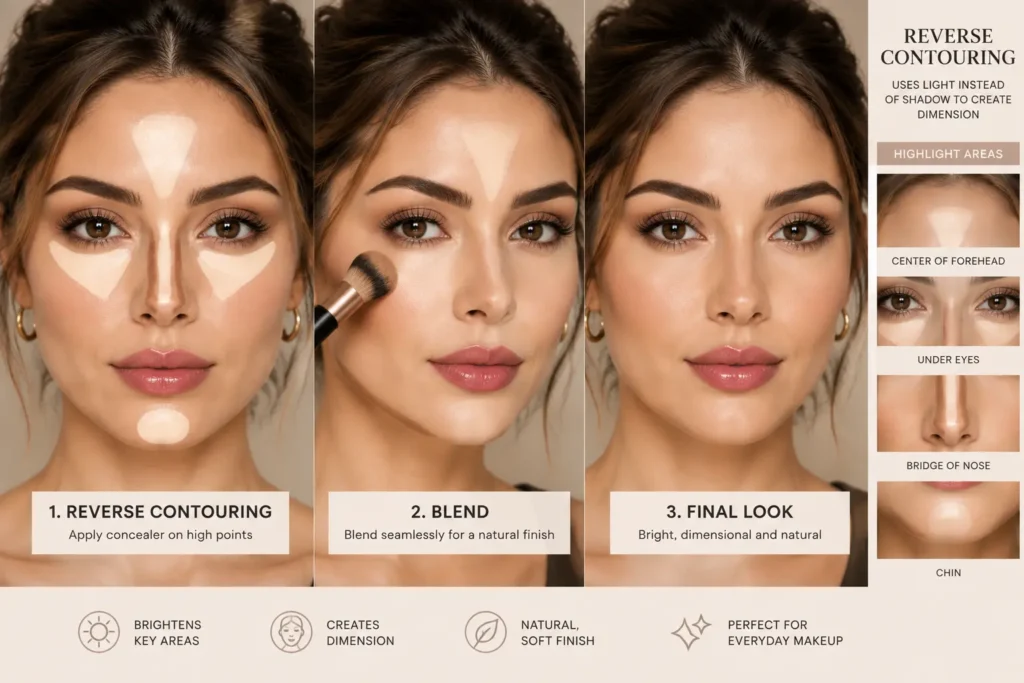
Reverse contouring focuses more on highlighting than adding darker shades.
Instead of creating definition with strong shadows, this technique brightens areas where light naturally hits.
Common areas include:
- Under the eyes
- Center of the forehead
- Bridge of the nose
- Center of the chin
The contrast between highlighted areas and natural shadows creates dimension while keeping the makeup soft.
6. Blush and Contour Fusion
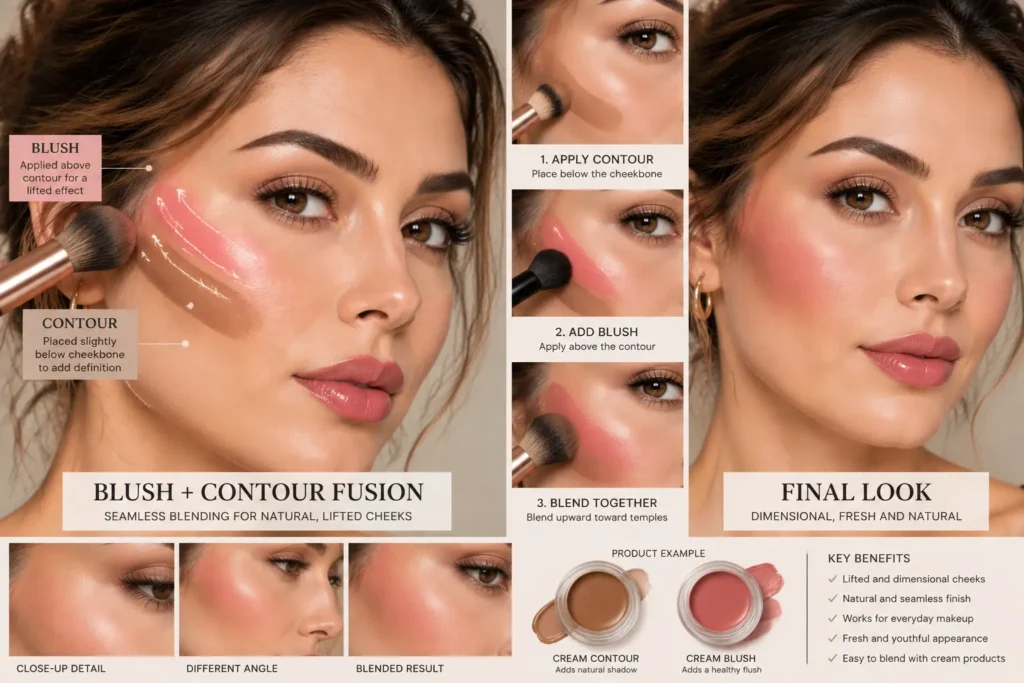
Modern makeup trends often combine blush and contour instead of treating them as separate steps.
The technique involves placing blush slightly above the contour area and blending both products together.
The result:
- More dimensional cheeks
- A fresher appearance
- Softer transitions between colors
Cream blush and cream contour usually work well together because they blend easily into the skin.
7. Soft Sculpting for a No-Makeup Makeup Look
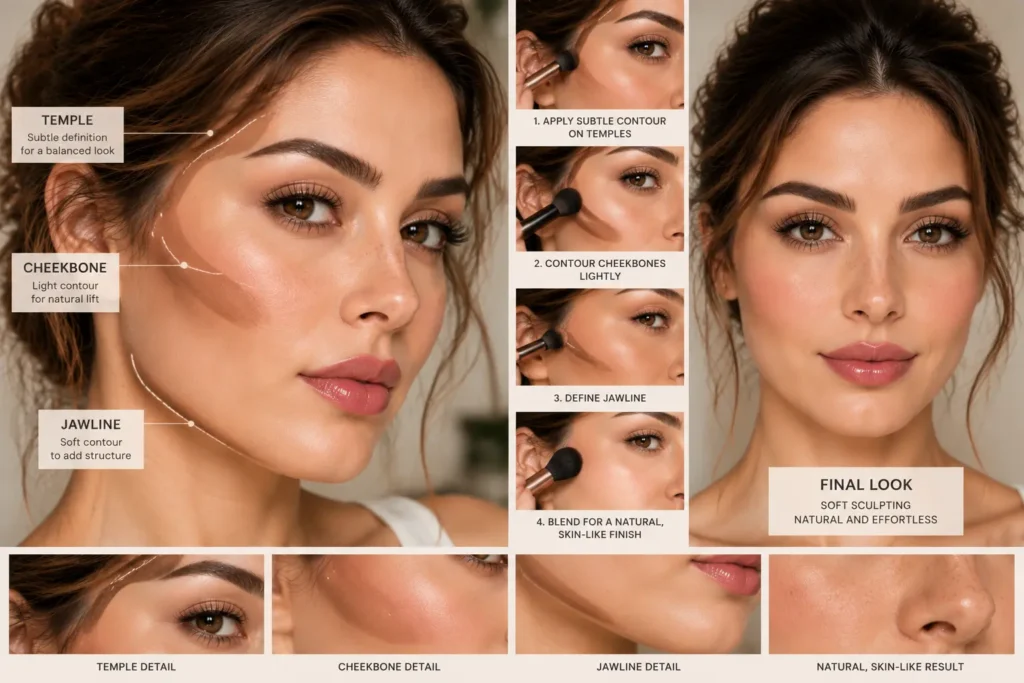
Soft sculpting is designed for people who want subtle definition.
A simple routine may include:
- Light cheek contour
- Minimal jaw definition
- Slight temple shading
- Natural blush placement
This style works well for daily wear because it enhances features without making the makeup look obvious.
8. Face Shape-Based Contouring
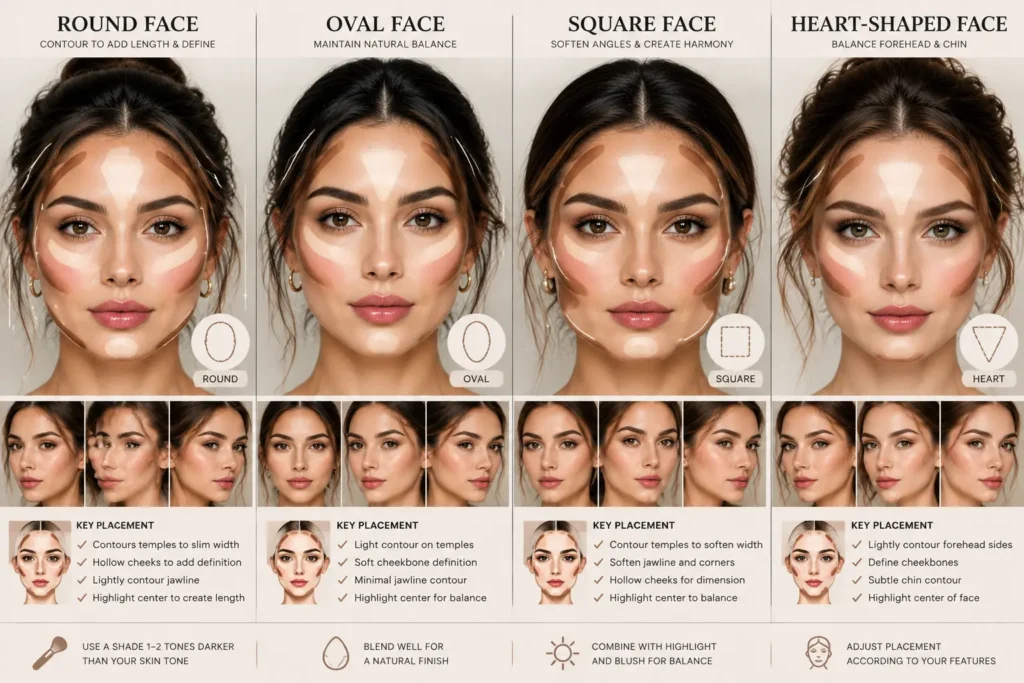
Contour placement should be adjusted according to your facial structure rather than copied from another person.
Round Face
Higher cheek contour placement can create the appearance of more length.
Oval Face
Minimal contour is often enough because the proportions are naturally balanced.
Square Face
Soft jawline contour can create a smoother appearance.
Heart-Shaped Face
Balanced contour around the forehead and chin can create harmony.
The best contour technique is the one that works with your own features.
A Simple Beginner Contour Routine
Step 1: Prepare Your Skin
Start with moisturizer and your usual makeup base. Smooth skin helps contour blend more naturally.
Step 2: Apply Small Amounts
Place contour only where shadows naturally appear:
- Below cheekbones
- Along jawline
- Around temples
- Lightly around the nose if desired
Step 3: Blend Carefully
Use a brush or sponge to soften the edges. The goal is to remove harsh lines while keeping enough definition.
Step 4: Balance the Look
Contour usually looks more natural when combined with:
- Blush
- Soft highlighting
- Light setting powder
Cream vs Powder vs Liquid Contour
| Formula | Best For | Finish |
|---|---|---|
| Cream contour | Beginners, dry and normal skin | Natural and skin-like |
| Liquid contour | Lightweight makeup lovers | Soft and seamless |
| Powder contour | Oily skin and longer wear | Matte and defined |
There is no universal best option. The right formula depends on your skin type, preferred finish, and how much time you want to spend blending.
Contour Mistakes That Can Make Makeup Look Unnatural
Choosing a Shade That Is Too Dark
A contour product should create a shadow effect, not look like a visible painted line.
Applying Too Much Product
Heavy application can make the makeup appear flat instead of dimensional.
Ignoring Your Facial Structure
A technique that works for one person may not create the same effect on another face shape.
Over-Powdering
Too much powder can emphasize dryness and texture, especially on mature skin.
Forgetting to Blend Into Surrounding Areas
Contour should transition naturally into foundation, blush, and the rest of the face.
How Long Does Contour Makeup Last?
Contour longevity depends on the formula, skin type, weather, and preparation.
Cream products may need setting in humid conditions or on oily skin. Powder formulas may last longer but can appear heavier if applied excessively.
Using thin layers and applying products strategically usually creates better results than adding more product.
Is Contour Makeup Suitable for Beginners?
Yes. Beginners often achieve better results by starting with simple techniques rather than advanced sculpting methods.
A good beginner approach:
- Choose one contour product
- Pick a natural shade
- Apply a small amount
- Focus on blending
With practice, you can adjust placement according to your own facial features and preferred makeup style.