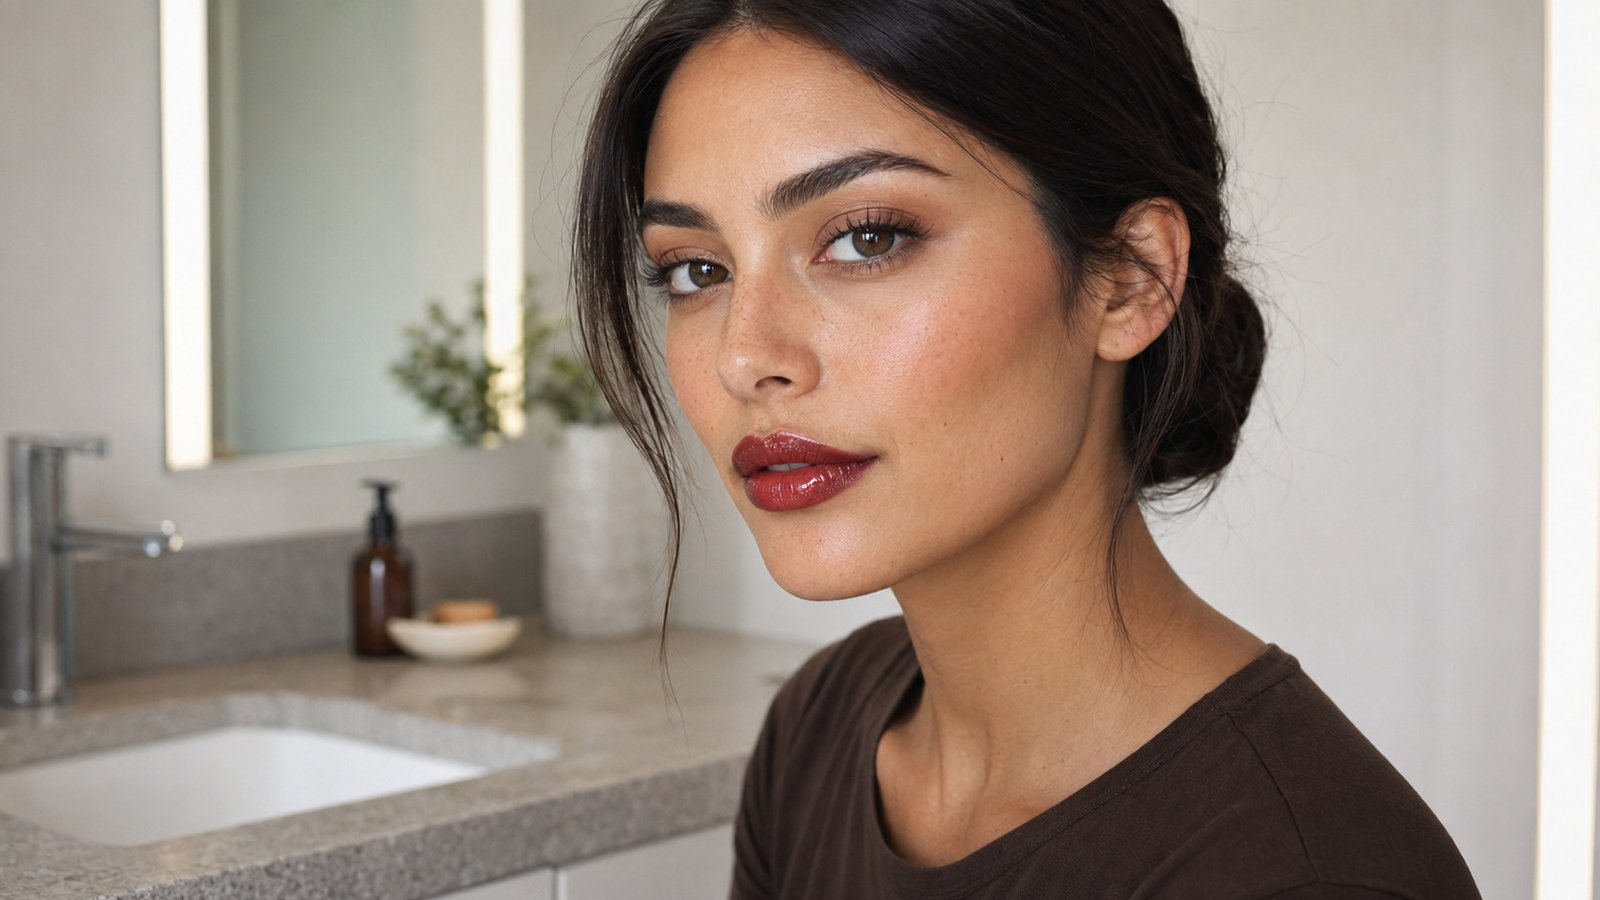
Cherry cola lips solve a very specific seasonal makeup problem: bright red can feel too summery, while an opaque wine lip can feel too heavy when the weather is still warm. This Cherry Cola Lip Combo Tutorial for Summer-to-Fall Makeup combines a softly shaded red-brown border with a sheer cherry center, giving you depth without the weight of a traditional dark lipstick. The finish looks juicy and dimensional in daylight but still polished enough for evening.
The look doesn’t depend on one viral product or expensive matching set. You need a blendable lip pencil, a transparent cherry or berry color, and optional gloss, but the undertones and placement matter more than the labels. Done correctly, the darker edge acts as a soft contour while the brighter center keeps your lips fresh instead of flat or muddy.
Quick Answer: Outline your lips with a red-brown, mahogany, or burgundy pencil, then shade the corners and blend the color slightly inward. Press a sheer cherry-red tint into the center without covering the entire border. Finish with a small amount of clear or red-tinted gloss concentrated on the fullest parts of your lips.
What Creates the Cherry Cola Effect?
Cherry cola lips aren’t simply brown liner covered with red gloss. The recognizable effect comes from a controlled color gradient: deeper and slightly muted around the perimeter, then clearer and redder through the center. This difference in depth visually contours the lips, while concentrated shine reflects light at the fullest points.
The “cola” shade can be neutral brown, red-brown, mahogany, or burgundy, depending on your skin tone and the red you plan to use. The “cherry” layer can be a stain, tinted balm, glossy lipstick, or lip oil as long as some transparency remains. If every product is fully opaque, the shades usually mix into one flat maroon instead of producing a visible cherry center.
The Three Products You Need
Start with a firm but blendable pencil in brown, red-brown, mahogany, or burgundy. It should be deep enough to define your mouth without looking nearly black against your skin. A very soft pencil can spread too easily once gloss touches it, while an extremely dry pencil may catch on natural lip lines and refuse to blend.
For the center, choose a sheer cherry-red, cranberry, berry-red, or muted crimson lip color. A stain gives you the lightest summer version, while a tinted balm or glossy lipstick creates a richer summer-to-fall finish. Full-coverage liquid lipstick can work, but you’ll need only a tiny amount because too much opaque color will hide the gradient.
The third product is an optional clear, sheer red, or lightly brown-tinted gloss. A thin, cushiony formula is easier to control than a thick gloss that pulls the liner across your lips. You don’t need a separate gloss if your cherry lipstick or tinted balm already gives you enough shine.
Good to Know: Swatch the liner and center shade next to each other before applying them. If the brown suddenly looks gray beside the red or the red appears neon beside the liner, their undertones are fighting. Changing just one of the shades is usually enough to fix the pairing.
Choose Your Cherry and Cola Shades
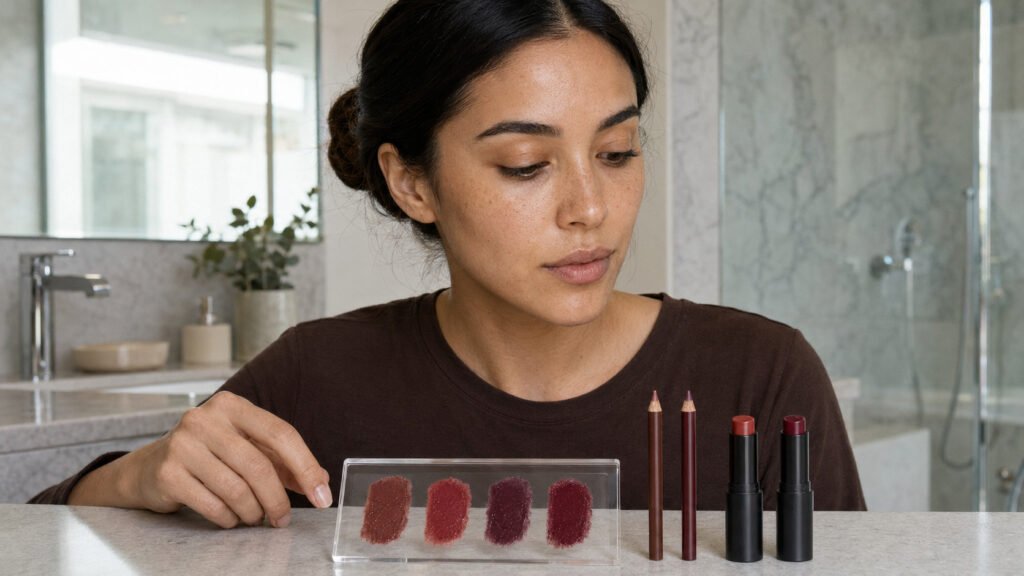
The simplest way to choose a combination is to match the temperature of the liner to the red. Cool burgundy blends naturally into cranberry, wine, and blue-red shades, while warm chestnut or cinnamon-brown works better with brick-cherry and warm red. Neutral red-brown is the most flexible option when you aren’t sure which direction suits you.
Fair and light skin can be overwhelmed by a very dark espresso outline, especially in natural daylight. A muted rose-brown, medium cocoa, or soft burgundy pencil creates enough contrast without leaving an obvious ring around the mouth. Pair it with a sheer true cherry or cranberry shade rather than an extremely pale pink-red gloss.
Medium and olive skin usually works well with red-brown, mahogany, and rich berry liner. Olive undertones can make apparently neutral products pull warmer once applied, so test the pairing on your lips instead of relying only on a wrist swatch. If chestnut liner looks slightly orange or makes your complexion appear dull, switch to neutral burgundy.
Deep skin can carry espresso, black cherry, plum-brown, and deep mahogany beautifully, but the center shade needs enough pigment to remain visible. A very sheer pink-red gloss may disappear against naturally pigmented lips and leave only the darker outline. Choose a saturated cherry tint or glossy lipstick, then control its intensity by applying thin layers.
Cherry Cola Lip Combo Tutorial for Summer-to-Fall Makeup
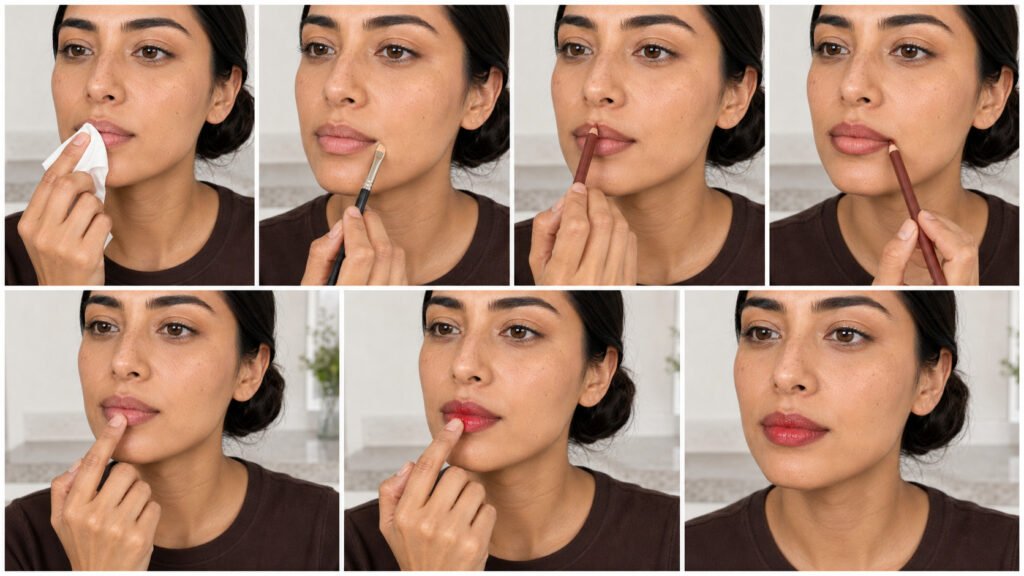
Step 1: Smooth Without Adding Slip
Apply a thin layer of plain lip balm five to ten minutes before starting your makeup, then blot away any balm still sitting on the surface. Comfortable lips help pencil glide evenly, but a slippery coating makes the liner move, fade, and collect around the corners. If you have loose flakes, press a damp washcloth gently over them instead of using an aggressive scrub immediately before color.
Step 2: Correct Only the Outer Edge
Tap a trace of foundation or concealer around uneven areas of the outer lip line, but don’t cover your entire mouth. Blanking out the lips can make a transparent red appear chalky and removes the natural depth that helps this combination look convincing. I used to conceal everything before darker lip looks, and the result consistently looked heavier and less wearable in daylight.
Step 3: Map Your Lip Shape
Mark the cupid’s bow and center of the lower lip first, then connect those points to the corners using short pencil strokes. This gives you more control than dragging one continuous line around the mouth, especially with a creamy pencil. If you want a fuller shape, overline only the center by a tiny amount and return to your natural border before reaching the corners.
Step 4: Build the Cola Shadow
Shade the outer third and corners of both lips using the side of the pencil rather than its sharp tip. Holding the pencil at a slight angle creates a wider, softer band of color and stops the outline from looking drawn on. Leave the center mostly bare so the cherry shade has a clean area where it can remain noticeably brighter.
Blend the inner edge with a small lip brush, clean fingertip, or cotton swab using short tapping motions. Keep the deepest pigment at the corners and outer border while softening only the point where it meets the center. Rubbing back and forth too much mixes everything together and removes the contrast you’re trying to create.
Pro Tip: Purse your lips once after blending and then relax them. Any uncolored gaps near the corners or inner rim will become easier to spot. Fill only those gaps instead of applying another heavy layer around the entire mouth.
Step 5: Press Cherry Into the Center
Apply your cherry tint, balm, or glossy lipstick to the middle third of the lower lip, then press your lips together once. Tap the transferred color outward without completely covering the deeper border, keeping the clearest red through the center. If the color looks too sheer, add a second thin layer rather than one thick swipe.
The center placement keeps the look fresh while the pencil acts like a natural shadow. Applying a slippery red directly across the entire mouth can dissolve the liner and move brown pigment into the middle. Stop blending while you can still identify a deeper perimeter, a softened transition, and a brighter center.
Step 6: Add Controlled Shine
Place a small amount of gloss on the center of the lower lip, then touch the remaining product to the cupid’s bow. Nudge the gloss outward with the applicator instead of sweeping it from corner to corner. Concentrating shine at the fullest points reflects light there while preserving the darker contour around the edges.
I’ve ruined this combination by applying thick gloss straight from the tube and dragging the wand over every layer. It picked up the pencil, spread brown pigment through the red, and turned the whole lip into murky burgundy. Wipe excess product from the applicator and build the shine slowly to avoid the same problem.
Step 7: Clean the Lip Line
Use a small flat brush with a minimal amount of concealer to correct obvious smudges around the corners. Avoid tracing a pale concealer border around your entire mouth because it can make a soft lip combination look pasted onto the face. Check the finished shape with your lips relaxed and in natural light, not only while posing in a close-up mirror.
Shift It From Summer to Fall
For summer, choose a softly defined rose-brown liner and a watery cherry stain, then finish with clear gloss or a lightweight lip oil. Keep the deepest color close to the natural border and allow some natural lip texture to show. This lighter version works especially well with mascara, fresh skin, and a muted cream blush.
To move the Cherry Cola Lip Combo Tutorial for Summer-to-Fall Makeup into early fall, switch to mahogany or burgundy liner and a richer cranberry center. Carry the liner slightly farther inward at the corners, but keep the middle translucent enough to preserve the cherry effect. Pair it with soft brown eyes, natural lashes, and restrained rose-brown cheeks so the makeup remains balanced.
For evening, deepen the corners with an extra layer of pencil and use a saturated black-cherry balm through the center. You can add more gloss, but keep it focused rather than coating the complete outline. The result should look richer, not dramatically darker or almost black.
Make the Lip Combo Last
Fill the corners and outer part of the lips lightly with pencil instead of drawing only a thin border. This creates a tinted base that wears down gradually, preventing the classic dark-outline-and-bare-center problem after eating. Pressing each layer into the lips also lasts better than piling several wet products on top of one another.
Apply the cherry color, blot it once, and add another thin layer before using gloss. When you need a touch-up, remove broken or thickened gloss with a tissue and restore the center color first. Redrawing the complete lip every time can make the outer edge progressively darker and less blended.
Clear gloss can pick up red-brown pigment and discolor inside the tube. If you want to keep it clear, place a little gloss on the back of a clean hand and tap it on with your fingertip or a separate lip brush. This takes an extra moment, but it also prevents the gloss applicator from moving your carefully placed liner.
Watch Out: Some long-wear stains grab dry areas and become darker along the inner lip. Test your stain at home before using it for an event or long dinner. A thin balm underneath may improve comfort, but too much will reduce the stain’s staying power.
Why Cherry Cola Lips Look Muddy
Muddiness usually happens when you overblend or combine products with clashing undertones. Once the brown liner and red center become completely mixed, you lose the lighter center and end up with one flat maroon shade. Add fresh cherry color through the middle and tap it only along the transition instead of blending it across the whole lip.
A cool gray-brown liner can also dull a warm, vivid red, while an orange-brown liner may make cranberry lipstick look disconnected. Change either the liner or the center shade so both lean warm, cool, or neutral. You don’t need to replace every product in the combination when one undertone adjustment can correct it.
If the outline looks severe rather than muddy, the pencil is probably too dark or hasn’t been shaded inward enough. Soften the inner edge, add more cherry pigment through the center, and press your lips together once. Don’t cover the dark edge with concealer because a pale border will make the contrast look even harsher.
Can You Skip the Gloss?
Yes, you can stop after applying a satin lipstick, tinted balm, or softly set lip stain. The finished look won’t have the glassy effect associated with the trend, but the red-brown gradient will still read as cherry cola. A satin version also feels more comfortable in windy weather and requires fewer touch-ups around loose hair.
People often treat maximum shine as essential, but in my experience, excessive gloss is the fastest way to lose the carefully blended border. A small amount placed through the center provides dimension without making the combination sticky or unstable. If your lips naturally have visible lines, a cushiony balm finish can also look smoother than a very reflective gloss.